
How to Build an Amazing Blog
This post may contain affiliate links. Please read my disclosure statement for more info.
I started https://ron-henry.com as a way to share what I’d learned over the years about finance, investing and life with the world. Blogging can be incredibly rewarding. You’re able to write a piece of content once and make it available for everyone to benefit from. It always brings a smile to my face when a reader leaves a comment letting me know that an article helped them solve a problem they were facing.
What I’ll outline in this post is how to start a blog just like the one you’re reading this article on. Let’s get started.
Which Platform? – Simple answer is WordPress
There are several options for creating a blog but only one good one: you want a self-hosted WordPress blog with your own domain name. It’s essential that your blog is hosted by a reputable hosting company.
There are three major benefits to using this method.
- There aren’t limitations around the topics you can write about which is definitely the case with free platforms.
- You decide if advertising is shown in your articles. Should you decide to run ads, you can control the types of ads. You also get to keep all the profit.
- Running your own site gives you complete control. You can run any plugin and customize all aspects of the site to your heart’s desire.
A Few Don’ts
Don’t sign up for a free WordPress.com account and park your new blog on yourblogname.wordpress.com. That screams amateur and seriously limits your ability to grow and monetize your blog in the future.
Don’t consider other blogging platforms. WordPress is THE option, the gold standard. More than 30% of the web runs on WordPress and because it’s open source, it’s completely free. Trying to use other platforms will eventually result in frustration and wasted time.
Now that we’ve hopefully got that settled, let’s talk about how to get your blog up and running in no time. It only takes three simple steps…
Step 1: Choosing a Hosting Provider
Starting your own website might sound complicated, but it’s something anyone can do. Companies like Hostgator are set up to make it as simple as possible. Their support has been exceptional for me when I needed a question answered. Here’s are the steps.
First step is to choose a hosting package. Hosting is space on a webserver. It’s the location where you’ll store all your text, images, and videos.
Hostgator has several shared hosting plans. Shared-hosting means that your space will be on the same server as other people’s space, instead of having a whole server to yourself—think of it like renting an apartment, rather than renting an entire building.
Hostgator’s cloud share-hosting services is what this site runs on. It’s been incredibly fast and stable.
Sometimes it’s tricky deciding which package to choose, but there’s no need to over-commit. Sign-up to the lowest priced package you can. Remember, you can always upgrade later if you want to start a second blog. Hostgator supplies free SSL with their hosting packages.
To help you saved even more money, be sure to use coupon code “RONHENRY“ at checkout. Here are the savings you can expect to receive on each package!
- 1 month: 30%
- 3 months: 30%
- 6 months: 30%
- 1 year: 40%
- 2 years: 50%
- 3 years: 60.5%
It’s a great way to save some money while getting your blog up and running.
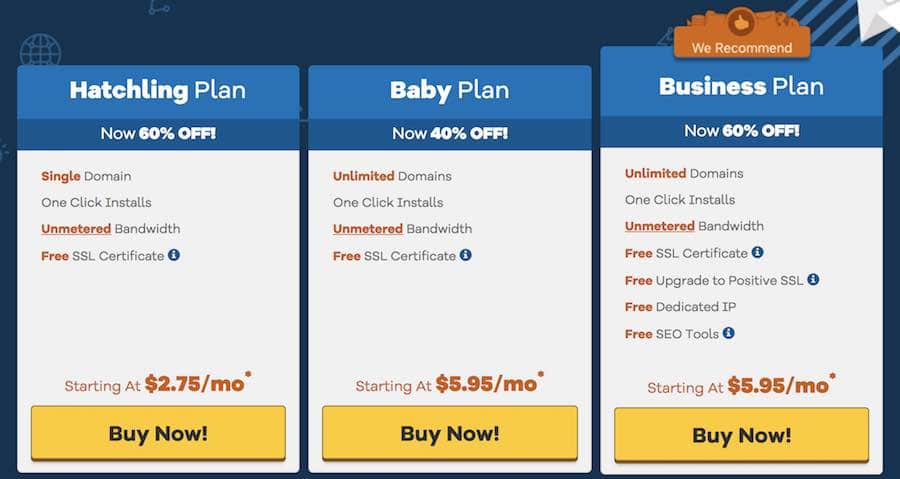
I started with the Hatchling Plan because at the time I only had one blog. I recently upgraded to the Baby Plan when I started my second blog. The Baby Plan is the most economical way to run more than one website.
Hostgator’s plans come with unlimited storage and email addresses. You’ll also find that they include a drag-n-drop website builder (you might have heard that called a WYSIWYG, or What You See Is What You Get) so you can build your own site without the help of a web designer.
They even give you a Google Adwords and Yahoo/Bing credit, so you can advertise your blog. Once I’d written some content, I used both credits to boost the visibility of my articles.
Once you’ve chosen your plan just click the “Sign Up Now” button and follow the instructions on screen.
Step 2: Register a Domain
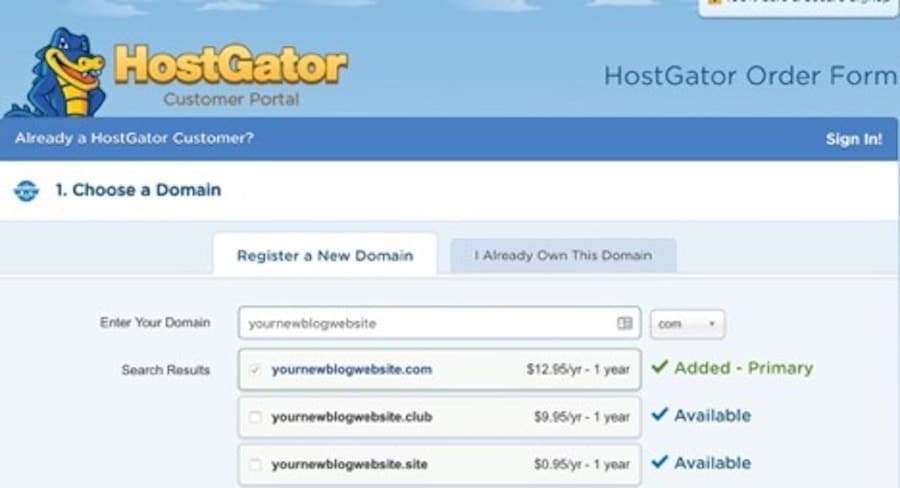
A domain name is how people find you online. You’ll want to choose a good one if you’re going to stand out. Some guidelines are you want your domain name to be memorable and easy to spell.
Consider names that are personal to you or that give the reader a clue about the topics you’ll cover. Because I knew my plan was to build a lifestyle blog, I used my name as the domain name. This gave me flexibility in the articles I write and allowed me to build my brand. Just an option to consider.
Hostgator offers a tool to help you find a domain. Just type in your choice and click “Search”. The tool will tell you if the domain is available.
It’s perfectly okay to register a domain with one company and have your hosting with another. But, if you do that you’ll be responsible for things like maintaining DNS records, and that’s server-admin level complexity. By registering your domain in the same place as your hosting, Hostgator takes care of everything for you.
Once you’ve chosen your domain, you’ll probably want to check the Domain Privacy Protection option. Normally, when you register a domain, you have to tell ICANN who you are. Anyone can look up this information. It displays who owns the domain and includes your address. If you use Hostgator’s Domain Privacy Protection your information is replaced with Hostgator’s. It’s still your domain, but your personal details won’t be disclosed.
Register the domain for as long as you want to (hosting is always annual) by following the on-screen instructions. Before the duration is up, you’ll need to renew to keep using the domain.
Step 3: Installing WordPress
At this point congratulations are in order. You now own your own website! Pretty cool. Now it’s time to get your blog up and running.
There are lots of blogging options, but the one chosen by most of the world is WordPress. It actually powers almost 1 in 5 websites, when people say blog, they often mean WordPress. Best of all, WordPress is free!
Open up your email and find the welcome email that Hostgator have sent you. You’ll see that there’s a link to your cPanel (which is simply short for “Control Panel”). Use the username and password provided and log in to your cPanel.
Look for the “Quick Install” button, and click it. Then, find the “Special Offers” section. Click on “Get Started with WordPress Today” to move to the next step.
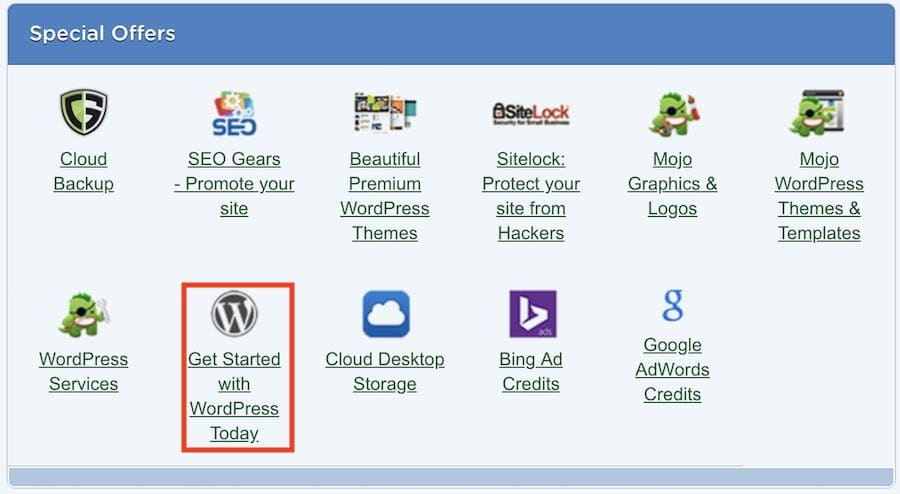
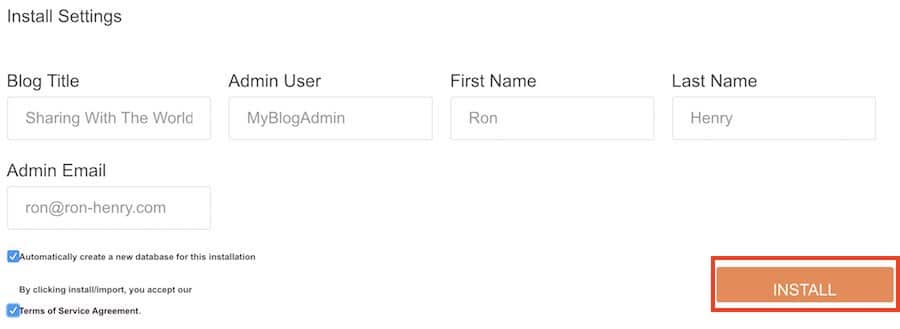
Click on “WordPress” and fill out the form. You can change these details later, but it’s important that you don’t use the same username as your cPanel username (because two username/password combinations are more secure than one).
Pro Tip:
Don’t use “admin” as your Admin username. Choose something unique since it will make it more difficult for a 3rd-party to guess.
When you’re ready, click “Install WordPress”.
And that’s it! You’ve set up a website, and installed WordPress. All that’s left is to start writing your first blog post. You’ll find that Hostgator and WordPress make it very easy to share your content with the rest of the world.
Now What?
To help you along your journey, I’ve put together a resources page that contains all of the plugins I used to add additional functionality to my website.
I’d suggest checking it out since it will save you from having to learn what works best. I already did the testing and hard work for you.
If you have any questions or if there’s anything I can help out with, don’t hesitate to drop me an email at [email protected]